Annotated Diagrams
An annotated diagram is a visual that includes labels for each part of an image, text, or diagram that students are using in content-area instruction. This strategy is part of Colorín Colorado's ELL Strategy Library and can be used to support academic language development for all students.
Professional Learning Resources

See hands-on professional learning materials about this strategy below, including a slide deck and presenter's guide.


Strategy Overview
How This Strategy Supports Language Development
Teachers often provide students with visuals or examples. The addition of annotations or labels for key parts of the visual makes the content of the visuals more comprehensible and assists students in understanding abstract concepts and using specific content-based words. Using an annotated diagram, students are more likely to speak and write with content-specific words accurately.
Diagram labels can be written in students' home languages and in some cases, as with the diagrams below, materials may already be available in different languages. Students can also help create bilingual materials to support their vocabulary development.
Step-by-Step Instructions
- Find a detailed image related to the target content you want to teach, such as a concept or process.
- Annotate specific parts of the diagram with key vocabulary.
- Ask students to work in pairs to describe the concept using the annotated diagram as a support.
Ask students to write about the concept using the annotated diagram.
Note: You can see a hands-on version of this process in this featured video of a class visit to a salmon hatchery in Alaska from the PBS Kids series Molly of Denali.
Lessons Learned
- The more the detailed image, the better because it provides more opportunities for annotating.
- Label nouns in the diagram rather than verbs because nouns are easier to see.
- A short list of 10 of the most essential words is optimal because students will not be overwhelmed and the diagram won't get too crowded.
- Teachers can co-create these annotated diagrams with students throughout a unit.
Differentiation
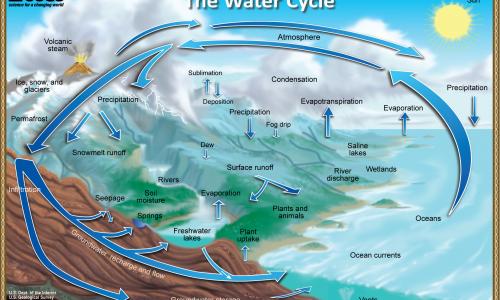
- Students' heritage languages can be added if students can read in their languages. Invite students to add the labels in their languages and review their diagrams with a partner who speaks their language. (You can also add labels in students' heritage languages, but be sure to review the final version with a bilingual colleague who can check for accuracy.) You can see samples in these water cycle diagrams from the USGS.
- The annotations can be written in a full sentence to explain what the nouns are doing.
- If the image is of a process, write numbers to indicate the order to further teach the content.
- Some students will benefit from having the noun and verb labeled, such as in the Picture Word Inductive Model.
Co-Teaching Considerations
Content or Grade-Level Teacher
- Choose a detailed image related to the content you wish to teach for your grade-level lesson.
- Create a list of key vocabulary for the lesson.
English Language Development Teacher
- Annotate the image for the whole class.
- Translate key vocabulary for the image if needed.
- Share ideas with your colleague about how either of you can use your annotated diagrams in the classroom, such as working with a small group to use the key terms in complete sentences.
- Explain how students can use this skill in other classes.
Professional Learning Session: Annotated Diagrams
This Colorín Colorado slide show walks through the Annotated Diagrams strategy and can be used for turnkey professional development sessions. Please share attribution to Colorín Colorado.
To get started, you need:
- Annotated Diagrams Slide Deck: Includes activities, discussion questions, and speaker's notes (also featured below)
- Annotated Diagrams Presenter's Guide: Includes tips for planning your session and handouts
To edit this presentation, you can download or copy the slides:
- File > Download (no Google account required)
- File > Make a copy (Google account required)
Note: Additional PD ideas are available in our ELL Professional Learning collection, which includes more strategy slide decks and an introductory session about the ELL Strategy Library.
Resources
- Academic Language (Colorin Colorado)
- Annotating diagrams, graphs or maps (Victoria State Government)